Eric Valentine on Tracking Drums
Eric Valentine is known for a some great rock records and a few of his techniques to getting those sounds is a bit unconventional.

For drums Eric prefers four mics on the kit...
Kick: Neumann U67
Snare: Altec 633a (salt shaker mic) or a Shure SM57
OH: AKG C12a (two of them)
SOURCE

For drums Eric prefers four mics on the kit...
Kick: Neumann U67
Snare: Altec 633a (salt shaker mic) or a Shure SM57
OH: AKG C12a (two of them)
SOURCE
Bruce Sweden on Monitoring and Levels
Audio Speakers & Amplifiers and volume levels in the control room....
Over the years I have been very fussy about the volume levels that I use in the control room. I have always tried to observe the American OSHA sound exposure standards.
I like to test my mixes at a variety of volume levels, and on a variety of different speaker systems. This will make sure that the mix will sound good anywhere. If a mix sounds good at a low SPL, it will sound great at higher levels..... Save your ears, we only get two!!!
For both recording and mixing I currently use Westlake Audios Lc3W-12 speaker systems. Glenn Phoenix of Westlake Audio called me one day and said that he had just finished a new speaker design. He suggested that I give it a serious listen. I was a bit skeptical at first about trying any new music-mixing speaker, but I should have known better than to underestimate Glenn when it comes to an audio-design issue.
Glenn brought a pair of his new speakers to the studio, so I could check them out. When I sat down at the console to listen, I was absolutely amazed! I have never heard speakers with more points of sound-source definition in the left-to-right panorama. In addition, the low end is spectacular! The scale of the soundfield is flawless.
To me, the mixing phase of my music projects is very personal and can get a bit intense. Mixing is the last phase of a project where I can make an artistic contribution to the sonics of the music, so the speakers are extremely critical to the success of the project.
Of course, any discussion of hyper-fidelity loudspeakers would be incomplete without an in-depth look at the amplifiers that drive those loudspeakers, and the wire or cable, that connect the amplifiers to the speakers, and the wire, or cable that connects those amplifiers to their source. In most cases that source would be the monitor output of an extremely high quality mixing desk.
Here’s an interesting little story that explains how I found the monitor amplifiers that I have used for music mixing for the past few years.
Early one morning, my good friend Trond Braaten called me from Fredrickstad, Norway and said that in a week he would be coming to the USA and he was going to hand carry on the plane, a very heavy Norwegian made power amplifier that was going to change my life! I thought to myself, “Yeah, sure.” Up to that point in time, all I knew about Norway could be summed up in four words! “Beautiful Boats, and SALMON!”
I Iearned something. Don’t ever underestimate the Norwegians!
A few days later Trond arrived on my doorstep, huffing and puffing, carrying an obviously extremely heavy box.(They don’t call Trond Braaten the “Norwegian Sherpa” for nothing! - “Sherpa” - Means mountain-climber from northern India, able to carry very heavy objects great disances”)
That heavy box contained a power amplifier that did change my life! I stared at the lettering on the box, and thought. “Electrocompaniet, Holy Cow! What a name! Almost impossible to pronounce.”
We hooked up the amplifier to my speakers. Great sound! Trond was right, my studio life has not been the same since! Wonderfully musical sounding amplifiers! Those amplifiers go with me to every recording project.
Here are the standard monitoring settings that I use for all my sessions. To set these values I normally use my Simpson [Type 2] SPL Meter. Or a Radio-Shack Sound Level Meter Catalogue #33-2050....
A-Mid-field monitoring - > Westlake Audio Lc3W-12s.... (Placed on top of meter over-bridge of mixing desk.)
1- To adjust the Westlake speakers for an SPL level of approximately 93 SPL -(Sound Pressure Level).
a-Set SPL meter.
1-'A' scale(OSHA).
2-speed-'slow'(OSHA).>
3-range-90.
b-Play wide-range complex program material.
1-Set playback for +3 buss peaks on VU scale.
2-Observe SPL results. (+3 buss peaks = 93 SPL peaks)
c-Make mark on monitor level control.....
Note: This will result in a good loud level for mixing Popular music. It can be used for a total listening time of 4 hours of mixing per day. When I mix at this level for 2 and 1/2 hours and then take a 30 minute break, I don’t experience any ear fatigue when using my Westlake Lc3W-12’s.
Note: If lower record buss levels are to be used, adjust SPL resultant peaks accordingly. e. g.-If absolute '0' VU buss peaks are to be recorded, then add 3 db of monitor level before marking the monitor level control.
B-Near-field monitoring - > Auratones.... (Placed on top of meter over-bridge on mixing desk.)
1-To adjust the Auratone speakers for an SPL level of approximately 83 spl.
a-Set SPL meter.
1-'A' scale(OSHA).
2-speed-'slow'(OSHA).
3-range-80.
b-Play wide-range complex program material. 1-Set playback for +3 buss peaks on VU scale.
2-Observe SPL results. (+3 buss peaks=83 SPL peaks)
c-Make mark on monitor level control. Note: This will result in a good Auratone level for mixing Popular music. It can be used for a total listening time of 8 hours of mixing per day. If lower record buss levels are to be used, adjust SPL resultant peaks accordingly.
e. g.- If absolute '0' VU buss peaks are to be recorded, then add 3 db of monitor level when marking the monitor level control.
Do not monitor at extremely high speaker levels. You should be able to carry on a conversation in the control room while you are mixing. If you have to shout to be heard, turn down the speaker level. You will only get one set of ear drums in your lifetime, treat them like the precious things that they are. Who knows, they might be worth a million dollars some day. Go easy on your ears. Permanent hearing loss can occur very quickly in a control room, especially with some of the new, super high-powered monitor systems in use in modern studios today.
That's a start.......
Bruce Swedien
SOURCE
Make-Shift PZM Mic
Most people think PZM mics are these fancy things and that there's a lot more going on under the hood then there really is.
It's really simple actually and you can do it with a mic you already have lying around.

Take your trusty Shure SM57 and place an eighth of an inch from the wall that's absorbing the sound of the instrument that's being recorded (playing).
That it!
The 57 will now capture the pressure of the sound from the wall and because of it's polar pattern will reject any of the other sounds around it.
Try it out for yourself.
Rick Rubin on Single Note Impact
Producer, Rick Rubin, is known to play a single low note of a piano leading into choruses or bridges to create excitement and impact within the recording.
In the mix, you blend this single note very low, so it's felt not heard. This creates a subtle lift for the listener and won't take you, but a few minutes to mic a piano or track a keyboard.
In the mix, you blend this single note very low, so it's felt not heard. This creates a subtle lift for the listener and won't take you, but a few minutes to mic a piano or track a keyboard.
Bruce Swedien on EQ
"I think EQ is EQ. It is frequency specific volume control. AS WITH COMPRESSION, I don't think of these devices as being used for one specific area of what we do.
Equalization....
To flawlessly reproduce a sound, all frequencies in the audible spectrum must be reproduced with the same intensity in the reproducing system, so that the balance of the spectrum coming from the loudspeaker is the same as the balance of the spectrum going into the system from the microphone.
This means that all the components in the signal path, from the microphone to the loudspeaker, must have a flat frequency response. This is, of course, \not possible in the real world of music recording studios.
The role of the equalizer is to control the gain, or volume, of one or more parts of the audio spectrum while leaving the other parts relatively unchanged. An equalizer is in actuality a frequency selective volume control. To me equalization is purely a matter of personal taste. The tone controls on your home stereo are a good example of using a control to change the tonal balance of music to suit our personal taste.(Or lack of same!)
To me there are really only two groups or catagories of equalization use in music recording.
#1-Corrective equalization.
#2-Creative equalization.
Both can be over-used and can be either helpful or detrimental to the emotional impact of the music involved. The trick is to use as little EQ as possible to achieve the desired result. Extensive use of EQ to correct a bad sound invaribly sounds artificial. Heavy EQ, and/or Filtering, is used to create effects, such as a telephone like voice quality. That is a valid reason for using a lot of EQ. That is a distinct example of creative EQ.
I see many engineers simply reach for the EQ without first really listening to the sound, or thinking about how it might be improved by thinking the situation out first. The real aim of equalization is to either overcome variances in the tonal quality of the sound sources, or to "Hype" the sound to achieve an emotional effect in the music. The real trick with EQ, to me, is to use it "gracefully", to enhance the music and make the sonic image more entertaining.
Equalization is probably the most abused and over-used tool in music recording. It is most often wrongly used in an attempt to correct faulty mike choice or placement. If the sound from an instrument is not pleasing, try changing to another type of microphone. If all else fails, use the equalizer. Don't be afraid to get a bit of exercise in the studio changing mikes.
A truly fine final product can only come from good basic recording. I do not believe in "don't worry, we'll fix that later in the mix-down." Most times you cannot fix it. You can improve it a bit, perhaps, but if it is a really bad track it never will sound right. Do it right in the beginning and you will never regret it."
Bruce Swedien
SOURCE
A More Organic Click
It's kind of lazy to set up a click in Pro Tools and then feed that to a drummer.
There's nothing wrong with this, but in my opinion, its a really impersonal element added to the recording process.
When recording, the aim is to make the performer comftorable (when necessary) so they can deliver a great performance.
A cool trick worth trying is send that click to their headphones for the bpm of the song. Now, have the drummer track a few bars of straight 'pocket', so just a straight groove for time. I'd recommend sticking to only kick, snare and hi-hat.
Make sure they really lock in to the click. If needed, time align the kick and snare in Pro Tools, but be sure not to edit it to the point where they lose their 'feel' on the drums.
Make that drum section a four or eight bar phrase and duplicate it across the session for the length of the song.
Now, turn off the click and send that recording to the band and drummer for the click.
It's my experience the drummer will lock-in much tighter and everything will track more naturally and keep the human element within the tracking session.
If you don't have time to do this, due to time constraints, take the time during some off time to get some loops for your sessions and keep those on a hard drive (you take with you). When it's session time, place them in the Pro Tools session and voila!...instant drummer happiness.
Ross Hogarth on Tracking Guitars
Part 1
Part 2
Part 3
Part 4
Part 5
Part 6
Part 7
Part 8
Thank you Royer for these incredible videos!
Part 2
Part 3
Part 4
Part 5
Part 6
Part 7
Part 8
Thank you Royer for these incredible videos!
Bruce Swedien on Stereo Micing Techniques
Stereo Music Recording Technique......
It's always been interesting to me that the beginnings of stereo music recording technique developed as kind of an 'underground', almost 'guerilla' effort, by the more progressive engineers and producers that were thinking 'Stereo' at that time.
Because of the reluctance of the major record company moguls to acknowledge the importance of stereophonic recording of music, and the hesitation of the folks that held the 'purse-strings' to pay for the additional reels of recording tape, the future of stereo music recording came very close to being a strangled 'baby' before it was out of the crib. Those of us that were interested in the future of stereo recording of music proceeded totally on speculation. We volunteered our efforts and the studios donated the tape to record many of these incredible musical performances in stereo. This speculation paid off in later years when many of those recordings have been re-released in stereo, often from tapes from the private collections of people such as myself.
One of the biggest problems for studios was that the control rooms that were designed in the 1930's and the 1940's were designed only for monaural recording and thus were very small. United Recording Studios in Hollywood was one of the first studios with control rooms designed expressly for the recording of stereo music product.
United Recording Studios in Hollywood were designed and built by my mentor, the brilliant engineer, Milton T. “Bill” Putnam. The Capitol Tower studios were completed shortly before the issue of larger stereo control rooms was settled. Those control rooms were re-configured and remodeled in late 1959 to accommodate the new stereo techniques.
I think I was kind of a rebel. I was very young at that moment in the industry, and I wanted to experiment with stereo. I knew there was something truly new and innovative. In my soul I knew that really good stereo music reproduction wasn't merely one sound source coming out of one speaker, and a different sound source coming out of the other speaker. My heart told me that there was far more to the adventure of high-quality music reproduction than just that.
I have always felt that we can reproduce the sound of music plus the feeling of music, more emotionally by using good stereo recording technique. But at that point in time, the people...the recording industry executives, really didn't want to hear about it. The people that ran the record companies at that time, didn't think there was much of a future in stereo. I remember one guy(I won't name him, he was a big executive with a major label). He said that, “Stereo was to him, like taking a shower with two shower heads... and you wouldn’t take a shower with two shower heads would you???...ha! ha! ha!. Shows you what small thinkers thery were.
They had so little trust in the future of stereo, that they wouldn't even pay for the tape or the extra stereo tape machine to record those priceless musical performances in stereo.
So I did it on my own.(A few other engineers at that time did the same thing.) We built a separate control room just for stereo. And we had to disguise it. We set up the separate control room for stereo in the back part of the studio complex, so that the record moguls wouldn't see the stereo machines and think they were paying for extra tape, or machines, and go crazy on us. Even with this bold guerilla effort on the part of a few, think of all the beautiful stereo recordings that vanished into thin air, because of small thinking on the part of the narrow-minded people that held the purse strings of the business!
What is Stereo To Me?
I don’t think I have ever seen a really good definition of what stereo music reproduction actually is. If we attempt to precisely define the word “stereophonic” , we find in the dictionary that the first half of the word, “stereo” means, solid, firm or three-dimensional. The second half of the word or, “Phonic” means pertaining to the nature of sound. I think that may be as close as we get to a definition of stereo music reproduction. I think a real definition of stereophonic should say that “Stereophonic sound is a reproduction system consisting of two or more microphones, placed in front of a sound pick-up area, recorded discretely on two or more channels of a multi-track recording device, and then played back on two or more loudspeakers placed in front of a listening area.”
This system creates the illusion of the recorded sound having direction, position and depth in the area between the loudspeakers. This playback system produces a sound pattern at the listeners ears which our hearing sense interprets as indicating direction and depth of sound field in the limited area between the loudspeakers.
In most cases, accurate localization is the goal of a stereophonic image. In other words, when recording a large orchestra, the instruments in the center of the ensemble are accurately reproduced in the area midway between the two playback loudspeakers. Instruments at the sides of the orchestra are reproduced from either the left or the right speaker. Instruments half way between are reproduced halfway to one side and so on... This type of a stereo image is what I would call “Basically - an unaltered acoustical event”.
For me, the problem is that this technique totally eliminates “Sonic Fantasy” from the recording process. It is the clinical approach. I find it somewhat interesting, but not very inspiring. Things got really exciting for me when I discovered that I could successfully record sonic images that existed mainly in my imagination.
In other words, Since the middle 1960’s I think my philosphical approach to using the "Stereo Space", has been to take the listener into a “New Reality” that did not, or could not, exist in a real life acoustical environment. This “New Reality”, of course, existed only in my own imagination.
Don't try to think out these Stereo Images too much.
DO NOT use any form of room calculation when you position your mikes in stereo,!!!
Your ears will tell you if there are phase problems.....
Do you use phase alignment tools? NO!!!!! (That's a lie, I always have an oscilloscope on the Stereo Buss.... But that's all!!!)
Bruce Swedien
SOURCE
Bruce Swedien on the "ACUSONIC RECORDING PROCESS"
When Quincy Jones, Michael Jackson and I were recording the Michael Jackson album “Off The Wall”, we wanted to coin a catchword phrase to represent my recording technique with multiple multitrack tape machines. So we came up with the phrase “The Acusonic Recording Process”. To my continued amazement, I am frequently asked to explain.
In fact on several occasions I have been offered impressive sums of money by recording studios, and companies that wanted to purchase “The Acusonic Recording Process”, thinking that it was a “Black Box” that recorded sound could be processed through.
I recollect one awkward circumstance, several years ago, when I got a phone call in the studio, from someone’s secretary, saying that a photographer’s team from a very respected, very important, foreign trade journal, was in an airplane on the way from somewhere overseas, to shoot a cover photo of “The Acusonic Recording Process” machine! I don’t remember exactly what I did, but I do recall mumbling something to the highly confused photographer about the machine being “away for repairs” indefinitely, and we’d have to reschedule the photo shoot! On my last lecture trip to Japan and Europe, I did admit to the press what the real deal with “The Acusonic Recording Process” was!
I had no idea when Quincy, Michael and I came up with the name that there would be so much interest in it.
_________________________________________________________________
Here's the Real Deal on "THE ACUSONIC RECORDING PROCESS"
"The year is 1977. Quincy called me one night and said "Want to go to New York and do a musical movie?". I said "Sure!". So off we went to do "The Wiz" for Universal Pictures. While we were working on “The Wiz”, we met this young, 18 year-old kid by the name of Michael Jackson.(Michael played the 'scarecrow' in the 'Wiz', the movie)
It was on the 'Wiz' that I began seriously using two or more multi-track tape machines together to realize the production values that Quincy and I were interested in.
It was during the recording of the score for the 'Wiz' that I came up with the basic system of organizing the tracks, the master tapes and the slave tapes that I still use. I call it "Multi-Track Multiplexing". This is the basic concept that spawned the catchword phrase the "ACUSONIC RECORDING PROCESS".
The "ACUSONIC RECORDING PROCESS" is, in reality, merely a name that Quincy and I came up with to describe my recording technique with multi-track recording machines.
The phrase is essentially a combination of the words ‘Accurate’ and ‘Sonic’. I figured the ‘Accurate’ part of it referred to the accuracy of true stereophonic sound imagery. The ‘Sonic’ part of it refered to the fact that it is sound that we are trying to characterize.
More specifically, the name "ACUSONIC RECORDING PROCESS" describes the way that I work with digitial and analogue multi-track tapes machines and SMPTE time-code to generate a virtually unlimited number of recording tracks. Initially I designed the system specifically for the projects that Quincy and I have done together.
I think the most important feature of this technique, and my method of implementing it, is that I am able to use pairs of tracks, in abundance, to record true stereophonic images, and then retain them in discrete pairs until the final mix. This method also allows me(when I use analogue recording in my work) to play the master tape only a few times during the initial stage of the project, and then put it away until the final mix. This feature retains much of the transient response of the analogue master tape, by not diminishing those fragile transients due to repeated playing during overdubbing and sweetening.
I frequently mix recording formats with my system of multiplexing multitrack tape machines. Now, of course, I use digital recording machines, in abundance, alongside my analogue machines. I think that what the basic digital recording medium does, it does dramatically well. Once I have the character of the sound to my liking, I will use a digital recording device to preserve it. As a storage medium, digital recording is unparalleled.
When I am working in the analogue format, I make several of what I call 'Work Tapes' using the original master SMPTE track and regenerating it through a code restorer so that the time-code is always first generation quality. I will then mix the rhythm tracks and make a stereo cue mix on the work tapes using as few tracks as possible.
Generally speaking, I will make a stereo mix of the bass, drums and percussion on a pair of tracks. Then I will make a stereo mix of the keyboards and guitars on a separate pair of tracks. If there is a scratch vocal track, I will transfer a copy of that track across to the work tapes by itself.
Using this technique, in this manner, give me a virtually unlimited number of tracks to work with. It was not obvious at first, but it soon became apparent to me that with this method, it is possible to do much more than merely obtain additional tracks for overdubbing.
Probably the most important advantage of this system is that I can record many more genuine stereophonic images by using pairs of tracks, instead of merely single monophonic tracks. These stereo sound source tracks, can be kept in discreet pairs untill the final mix.
These true stereo images add much to the depth and clarity of the final production. I have a feeling that this one facet of my production technique, contributes more to the over-all sonic character of my work, than any other single factor.
THERE’S MORE TO THE STORY...
My career actually began before stereophonic sound was of any interest to the industry, let alone the general public. This gave me the opportunity to do a great deal of experimentation, in stereo microphone technique, at my own pace. Consequently, I was able learn about what true stereophonic sound reproduction really is, before the commercial pressures came to bear. This also gave me a chance to learn what the emotional value of stereo imagery in music can do to increase the emotional impact of recorded music.
When we first started to record in stereo, our goal was to create a natural sound field, that had as its basis a real support of the music that we were trying to preserve. The big problem in modern music comes when we begin to overdub parts and layer the orchestrations.
The number of tracks necessary to realize the music can become astronomical in quantity, and thus becomes psychologically intimidating. This definitely need not be the case. I soon realized that this system makes it easily possible to have all the tracks I wanted to acomplish my musical objectives.
An additional and equally important value of this system, is that I can also add a great deal more emotional impact to the final product, by not having to make any balance decisions, early in the production of a piece of music, that are wrong, simply because I couldn't make a good value judgement because I wasn't hearing all the parts of the music. In other words, I never finalize any pre-mixes, or balances in a piece of music untill I have heard all its' musical elements, and how those elements relate to each other, to form the whole emotion of the music.
When overdubbing vocals for instance, I can record all backgroud vocals in stereo, and not combine or pre-mix anything permanently, untill all the parts in the song are complete, and I can hear how all the musical values relate. I guess I could say that, with this method, I never have to erase a track!"
THAT BASICALLY IS THE ACUSONIC RECORDING PROCESS...
Note: The correct spelling of the process is: “THE ACUSONIC RECORDING PROCESS”
Bruce Swedien 10-12-84 _________________________________________________________________
The preceeding is the text of a talk I gave in October, 1984 at a NARAS Los Angeles chapter luncheon. It is an effort to answer a subject that I am often asked to define. I had no idea when Quincy and I came up with the name that there would be so much interest in it."
Bruce Swedien
SOURCE
Bruce Swedien on Tracking Synthesizers
"I’d like to share something with you that I find absolutely fascinating!
____________________________________________________________
We have also Soundhouses, where we practise and demonstrate all sounds, and their generations.
We have harmonies which you have not, of quarter sounds, and lesser slides of sounds. Divers instruments of music likewise to you unknown, some sweeter than any you have; together with bells and rings that are dainty and sweet. We represent small sounds as great and deep; likewise great sounds as extenuate and sharp; we make divers tremblings and warblings of sounds, which in their original are entire. We represent and imitate all articulate sounds and letters, and the voices and notes of beasts and birds.
We have certain helps which set to the ear do further the hearing greatly. We have also divers, strange and artificial echos, reflecting the voice many times...and some that give back the voice louder than it came...
We have also the means to convey sounds in trunks and pipes, in strange lines and distances.
___________________________________________________________
Interesting isn't it?
This is a quotation from Sir Francis Bacon’s‘New Atlantis’ . He wrote and published this work in 1624. The‘New Atlantis’ was an original work by Sir Francis Bacon predicting what life would be like in a “Utopian” world of the future.
I think that we, in the age of modern music making, have a tendency to think that we, and we alone, are responsible for the original thought and the creation of modern music.
I think this fascinating little quote shows both how much music has developed over the past 350 years and perhaps more interestingly, how little.
How does this line of thinking effect us as Music Recording People?
In much the same way as a painter mixes colors on his palette, a synthesizer has the potential to reproduce nearly any audible sound by combining different sonic elements.
Replication of the sounds of traditional instruments is the most academic application of the synthesizer; it is also the safest and most boring ground for the artist; I think the sythesizer holds far greater fascination for those of us who see it as a means for departing from the traditional, into new and unexplored areas of music and sound.
For the electronic music conceptualist, the synthesizer has the potential for creating thousands of timbres and orchestral combinations never heard before.
To me, in recording the synthesizer, I have found that the direct, virtual sound of a sythesizer plugged directly into a tape recorder, is not very interesting. In fact, I find it more than just a little drab and lifeless. In my work, the synthesizer is frequently used to represent the orchestra, either in part, or the whole orchestral sound. I have found that by adding the drama of acoustical support to the sonic image of the synthesizer, the result is far more satisfying.
I send the sound of the synthesizer out into the studio through loudspeakers, and then mike the room with my B & K omni’s, or similar, in a classic X/Y microphone set-up. Then I combine the resultant acoustical support with the direct outputs of the synthes. By miking the studio, in this manner, I add the early reflections that are present in the acoustics of the room to the sound-field of the synthesizer. These first, or early relections are not generated, in a high-quality manner by any reverb or effects device. These extremely short acoustical reflections make the synthesizers sound much warmer and more musical.
This use of co-incident mics in a classic X/Y configuaration, in an application such as this, gives us a sound-field with the direct sound of the early relections being almost totally phase coherent. The indirect sound is, of course, phase incoherent, giving that beautiful stereo spread. This technique, to my ear, adds a great amount of detail to the texture of a synthesized sound source."
Bruce Swedien
SOURCE
The Bruce Swedien Hi-Hat Snare Separator
Bruce Swedien was known for bringing around this little device that helped reduce bleed from both instruments by setting up a baffle between the two.
Here's a picture Bruce posted of it online.

SOURCE
Here's a picture Bruce posted of it online.

SOURCE
Tchad Blake Mic Choices for Drums
Kick Out: Neumann U47
Kick In: AKG D112
Snare: Neumann U87
OH: RCA 44
SOURCE
Using Plugins While You're Tracking
Greg Wells states that he likes while tracking to try to use plugins to balance the song as it's being made, so it can lead him to what needs to be done next in the tracking phase.
I'll do this from time to time as well, but for me at least...I don't want to box in the artist too much and make it dependent on those plugins. They're just a tool to go in future for a second and see what this will sound like when it's finished real quick and then come back to earth and have an idea of where it should go.
SOURCE
Performing Live Automation
We forget this so often as engineers and producers, but people are capable of automating themselves. A little more muscle when playing the drums on chorus is far better and more natural sounding than automating a fader in Pro Tools so things get louder. In my opinion, that should be a last ditch effort, not your first thought.
We can navigate the end result of a session much better if we coach the performance and get the end result we want as it's going into the mic. The same can be done for singers by getting closer and further from the mic or guitars strumming a little harder or a lot harder.
Don't wait till mixing to do what you wish was in the recording, put it in the recording while you have the chance.
Al Schmitt on Self Balancing & Mic Bleed
If you've followed Al Schmitt for any amount of time you know he's an avid fan of live tracking and placing musicians close to each other when tracking. He like others has said that musicians balance their own levels when they're close to each other and can hear the other band members. This makes less work for the engineer and creates an organic chemistry in the recording.
Al also believes in allowing mic bleed (leakage) when tracking as he says when you use good microphones and the sound of another instrument blends into another microphone it makes the instruments sound larger than life and the leakage dictates how the mix should go.
Note: If you have cheap mics, I'd recommend being wary of too much leakage.
SOURCE
Out of Tune Vocalists
Often times if a vocalist sounds pitchy it's smart to check their headphone mix. If the mix is loud it could cause them to lose pitch as they're singing beyond the note and overreaching.

Instead, advise them to turn it down and to focus on the music not their own voice. Tell them to sing within the music not at it. This challenge often helps singers relax more and sing on pitch as well as fit within the track better. It's a simple trick, but it works.

Instead, advise them to turn it down and to focus on the music not their own voice. Tell them to sing within the music not at it. This challenge often helps singers relax more and sing on pitch as well as fit within the track better. It's a simple trick, but it works.
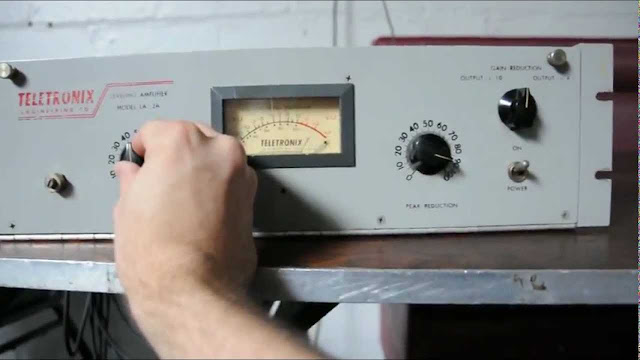
Eric Valentine on LA-2A Distortion
Eric Valentine regularly sends a DI electric guitar track through an LA-2A peak limiter and and cranks the input till it has a gnarly distorted sound. It's a very unique sound and will help your DI track stand out in the recording.
SOURCE

SOURCE
Treating a Sick Vocalist
Vocalists get sick and generally right before your tracking session, it's unfortunate but it happens sometimes. I find it wise to have a few essentials handy if this happens.

These are...
Breathe Right Strips
Netti Pot
Honey & Lemon Juice (great for colds)
Throat Coat
...and...if all else doesn't work...a shot of Tequila might do the trick.

These are...
Breathe Right Strips
Netti Pot
Honey & Lemon Juice (great for colds)
Throat Coat
...and...if all else doesn't work...a shot of Tequila might do the trick.
Bruce Swedien on His Favorite Vocal Mic
Bruce Swedien (Michael Jackson) was known to prefer the Shure SM7b for tracking vocals. It was go to mic choice and used it on many of the Michael Jackson sessions.
“I was allowed the freedom to make microphone choices, and nobody ever said a word. I just did it. For example, I used a Shure SM7 on most of Michael’s lead vocals — ‘Billie Jean’, ‘The Way You Make Me Feel’ — and boy, did that raise some eyebrows! But I love that mic, and I have six of them. The first one that I bought was in 1977 … one of the first SM7s to be used on a major music project. It’s dynamic of course and it worked just flawlessly with Michael – if you notice you can hear all the lyrics very clearly.”
SOURCE
Tuning the Tom Groove
Many times, tom toms are the bastard sons of the drum kit.
We as engineers spend a considerable time tuning the kick, baffling it, tuning the snare, getting the right heads for it, but toms are often overlooked.
I think it's important to put some effort into this part of the kit, but one simple thing you can do is tune the toms to the key of the song. A simple place to start would be the root and fifth of the key of the song you're recording. You can of course tune the toms to any note in the scale of the song, but I think tuning the drums to the key of each song is any easy way to unify the drum sound and any tom grooves to the rest of the instruments in the recording.
Snare Mic Positioning
Another simple one.
If you point the mic head parallel with the drum head, you'll get more of the body of the snare in the recording. If you point the mic at the point of contact (where the stick hits the snare), you'll get more of the stick sound.

The positioning matters and having a game plan for which sound is best for the recording will give you a better result in the end.
Changing the Drum Tone With the Drum Stick
An incredibly simple and cheap way to get different tonal choices for drum recording is simply, changing the drum sticks out.
Put simply, the bigger (fatter) the stick, the bigger the sound, the smaller (thinner) the stick, the smaller the sound.
Small sticks tend to give more definition and articulation, while larger sticks produce more 'power'.
For rock sessions the standard 5B size sticks will do the trick, but try different gauges out and see how they change the drum tone.
A simple trick, but one that's saved drum sessions countless times for me.
Matt Wallace on Picking the Right Mic Unbiased
Matt Wallace did a blind test to choose his favorite mic for vocals and had an assistant record the same singer, singing the same section of a song on all the mics he had. In this batch of mics were some microphones that cost up to ten grand, some high profile, top dollar mics.
Only the assistant knew which mic was which and multiple times Matt chose the inexpensive MXL 990, which retails for $99.

This proves, that we need to learn to listen with our ears not our eyes or preconceived notions.
Matt now owns a few of the 990 mics and uses them all the time.
SOURCE
Only the assistant knew which mic was which and multiple times Matt chose the inexpensive MXL 990, which retails for $99.

This proves, that we need to learn to listen with our ears not our eyes or preconceived notions.
Matt now owns a few of the 990 mics and uses them all the time.
SOURCE
Steve Albini on How to Change Tones in Tracking
Although some engineers prefer to use EQ and compression in the tracking stage, Steve Albini prefers to move microphones or change microphones, perhaps even change instruments if necessary.
His goal is to listen to the instrument with his naked ear and then aim to have that tone come out of the speakers.

SOURCE
His goal is to listen to the instrument with his naked ear and then aim to have that tone come out of the speakers.

SOURCE
Steve Albini on Wider Stereo Image with Guitars
Steve doesn't track the same guitar, especially when playing the same chordal pattern. You can get a much wider stereo image if you track two different sounding guitars, such as a Les Paul and a Telecaster. When you hard pan the two guitars it will make your mix sound wider and therefore have more depth.
Tracking the same guitar for both parts would create what I call 'wide mono', as the same guitar is on both sides.

If you only have one guitar use different chord inversions, play the chords in a different register, change the pickup selector (if it's possible), detune the guitar and use a capo.
Paying careful attention to how you track the guitars will give you a wider stereo image in your end result.
SOURCE

If you only have one guitar use different chord inversions, play the chords in a different register, change the pickup selector (if it's possible), detune the guitar and use a capo.
Paying careful attention to how you track the guitars will give you a wider stereo image in your end result.
SOURCE
Headphones and the Engineers Who Use Them
Proper monitoring is a big issue in recording, whether it be checking for phase or listening for sibilance, monitoring is very important in any studio.
I find having a pair of headphones you know and trust to be a great cheat in a home studio environment or when working working at a foreign studio. The headphones can be your main reference if you get a good pair and learn to listen on them properly.
I personally use the AKG K240's and have for years, but here are a few engineers you may know and the headphones they prefer.
Sylvia Massy- Beyer-Dynamic DT770

Andrew Scheps- Sony MDR 7506

George Massenburg- Grado RS-1

Al Schmitt- AKG M50

Tony Maserati- Sennheiser HD600

Sylvia Massy on Tracking Synths
For modern synths that lack character, Sylvia will use a small tube amp such as the Piggy or Valco for re-amping the synth, so it has a "human feel" to the sound. She finds this technique especially useful because it makes space for other instruments, as it makes a stereo synth into one mono track, but with more character.

SOURCE

SOURCE
Sylvia Massy on Micing Drums
Kick inside - Sennheiser 421
Kick outside - NS-10 speaker wired reverse to use as a sub mic, through a countryman DI
Snare top - Shure SM57
Snare bottom - Sennheiser 441 (reverse phase)
Hat - Shure SM81
Ride - Shure SM81
Tom tops - Shure SM98
Tom bottoms - Sennheiser 421 (reverse phase)
Overheads - Mojave MA200
Rooms - AKG 414
Mono rooms - whatever looks like fun!
"When setting up the mics I try to have them all pointed in the same general direction to reduce phase cancellation, usually all drum mics are angled somewhat in the direction of the back wall. The overheads mics are set in a way to target the cymbal groups. I'm less concerned about where the snare is in the overhead image. I especially check for phase issues between snare and overheads to make sure the drums sound big and punchy all the way around.
All mics get routed into the Neve 8038 console with 1073 mic pre/EQs (lucky me!).
I suggest to NOT recording each mic to it's own track. I will sum several mics on the console using the bussing, checking phase carefully then committing to a blend in advance of recording. I commit top and bottom snare mics to ONE track. I commit all tom mics, tops and bottoms and the whole array to TWO tracks, carefully adjusting levels and phase. I find the toms and the snare will sound better if you blend and record the mics together at the time they are played. I keep the kick "inside" and the kick "sub" mics on separate tracks, as well as the overheads, rooms, hat and ride.
I use compression during tracking only on the rooms, and maybe on the overheads, depending on the type of music.
If you want your drum recordings to sound good, learn how to tune drums! Have fresh heads available during tracking and change often if you want crisp attack on the snare and toms. During the Tool sessions we changed tom and snare heads between each TAKE!!!! Hydraulic heads sound good live, but often sound thuddy and lifeless in the studio. I usually use Remo Ambassador single-ply coated on the snare top, and clear on the tom tops.
I suggest having a favorite go-to snare on hand, tuned and ready at all times. That way if you are struggling with the client's crappy snare, you have an instant winner within reach. I use a '70s Ludwig Black Beauty. It is consistent, clear and loud, always sounds great.
Kick drum is easily adjusted by adding or removing damping material on the inside of the drum. I'll have a selection of towels, t-shirts, blankets and pillows on hand for whatever is needed.
A loud hi-hat is not always your friend in the studio. I have darker, quieter hats on hand in case the client's hat overwhelms the drum recordings. Nothing worse than trying to get rid of an obnoxious open hat later on in the mix!
Finally, and most importantly, the drums always sound great when you have a good drummer. Drummers who consistently play hard make the drums sound better!"
SOURCE
Sylvia Massy on Acoustic Guitar
"When recording a fingerpicked acoustic guitar I will often use a U47 Telefunken mic into the Universal Audio 175b, set on soft compression, just enough to bring up the quiet stuff but not so heavy as to make the strings sound spiny or prickly.
I generally do not use a stereo micing technique on acoustic guitar. I place the single mic close to the guitar, in front of the sound hole up near the high frets. I generally will use an acoustic guitar that does not have electronics in it."
SOURCE
I generally do not use a stereo micing technique on acoustic guitar. I place the single mic close to the guitar, in front of the sound hole up near the high frets. I generally will use an acoustic guitar that does not have electronics in it."
SOURCE
Sylvia Massy on Bass
Sylvia's preferred bass rig...
Fender Jazz Bass
Ampeg SVT vintage 70's bass head
Ampeg 8x10 bass cab
Countryman DI
Neve 1073 mic pre/EQ Urie LA-3As
Sennheiser 421 close micing the bass cab or an AKG D112.
SOURCE
Fender Jazz Bass
Ampeg SVT vintage 70's bass head
Ampeg 8x10 bass cab
Countryman DI
Neve 1073 mic pre/EQ Urie LA-3As
Sennheiser 421 close micing the bass cab or an AKG D112.
SOURCE
Sylvia Massy on Running Vocal Tracking Sessions
I love tracking vocals. I usually give the engineer the day off as I dig in for a one-on-one with the singer.
I prepare by creating 16 or so Work Tracks in the ProTools session, all with the same input and output (I don't use playlists). I open the "comments" boxes on the tracks in anticipation of making performance notes. The returns will have no effects. I don't want the singer to hide behind reverb wash.
My favorite vocal chain is a Telefunken U47 into a Neve 1073 mic pre/EQ with a UA175b and a Urie1176 limiter/compressor on the way to the recorder. Not much EQ adjustment during vocal tracking, but I'm not shy with compression and usually have them set fairly strong. I ask the vocalist to get loud so I can set the peak level, then I ask the vocalist to sing softly to make sure the quiet stuff comes up.
I start by recording two full passes of the song, so the singer will feel comfortable and I can get to know the song. These "warm-up" tracks provide a visual guide of where the vocals are in the song. Those first two takes are usually full of good performance bits that I can put into the comp later.
After the first two "warm-up" takes, we will concentrate on one section of the song at a time, recording four or so takes of verse one, etc., each take recorded on its own Work Track, staggering tracks as we go. As we record, I tap notes into the comments box, identifying what parts of that performance I like, using an easy labeling system:
V1 = verse one PC1 = pre-chorus one C1 = chorus one BR = bridge etc...
So, if I like the performance on the third phrase of the first verse, I will mark it as:
V1c*
More stars signify liking it better. If I don't like the take, I don't mark it. If I really like the take, I'll mark it with three or four stars! By the end of recording, the comment boxes are usually full of notes, which I use to make a comp of the best parts of our vocal recording. I'll create a Lead Vocal Comp track in the session and drag the best bits from the Work Tracks onto this track. The notes make it so easy that often I will have the Comp finished before the end of recording, as I'll be cutting, dragging and pasting while the vocalist is still singing. I'll then listen back to the Lead Vocal Comp, detail it, move anything with timing issues, clean up and add fades.
Often there will be good left-over lead vocal takes, and I'll use those to create a pair of unison doubles to add dynamics in the choruses. I will also build color by adding pairs of harmonies in sections of the song. If the singer does not have an idea for a harmony, I will sing some harmony ideas, using a talk-back mic to record parts into the session, then have the singer copy what I have done. Many vocalists do better to sing the harmony part without hearing the lead part that they are harmonizing to.
Oh, there are so many situations and challenges in vocal recording to address. I have a whole bag of tricks to get what I want out of a vocalist. I'll often distract them in ridiculous ways to get their mind off of their throat. Tasks like "pretend you are swimming", or "jump up and down", or "run around the block three times and come back and sing". Once I had a singer dress up in a wedding dress to get her magic vocal performance. On the System Of A Down record, I had Serge hang up-side down and scream. His face turned bright red and his eyes started to pop out. Almost killed the guy... so I stopped doing that!
Here is a photo of a finished vocal session, with the Lead Vocal Comp at the top, Lead Doubles directly under it and pairs of Harmonies and other backing tracks. Ready to mix!
SOURCE
Sylvia Massy on Drum Overheads
My favorite overhead mics these days are a pair of Mojave MA200 mics that I got from Dusty Wakeman (hi Dusty!). They are large diaphragm cardioid-style tube condensers similar to classic Neuman U67s. I have on occasion used a M/S technique to record overheads. To do this I use a stereo mic (AKG C24 preferred), placing it horizontally over the drummer's position, with one capsule facing directly down in a cardioid pattern and the other facing sideways in a figure-eight pattern.
I bring the signal from the cardioid "middle" capsule up on a single channel on the console, while the figure-eight "sides" capsule I split and bring up on two channels of the console. The split "sides" channels are panned hard left and right, and I reverse the phase on one channel by using a reverse-phase patch cable in the patch bay (I find this sounds better than reversing the phase on the channel strip). After all this complex set-up, I push the out-of-phase "sides" channels up equally then add the "middle" signal into the picture... the spread and directionality of the overheads is quite dramatic!!!!
SOURCE
Vance Powell on Baffling Drums

Here's a picture from a session run by Vance Powell where it seems he's using rags of some sort to baffle the toms and a sheet of paper on the snare.
Eric Valentine on Acoustic Guitar
"I do use a particular micing technique I like for getting a big stereo acoustic guitar sound. I like getting the strings to pan across the stereo field. So you put one mic above the guitar angled down and one mic below the guitar angled up equal distances both pointing at the neck. The mic above gets more of the lower strings and the mic below gets more of the higher strings. I never really liked the thing of putting one mic near the bridge and one near the neck. The 2 mics sound too different and create kind of an odd irrelevant stereo image.
I really like being able to hear the placement of the notes across the stereo field kind of like a piano. Seems to be a more meaningful stereo image. The 2 mics are basically at a 90deg angle from eachother both pointing at the neck of the guitar. You can change the voicing of the pair by moving their orientation to the guitar. i find that pointing them at around the 15th fret seems to get the most natural balance. If you put them more in front of the sound hole it will get bassier and woodier, if you move closer to the 12th fret it gets brighter and more sparkly. I have used a variety of mics in this configuration: 67s, 251s, coles 4038s and more recently shoeps 221Bs. The shoeps were pretty wonderful. I didn't have to EQ them at all when recording, mixing or mastering.
The voice isolation thing is tricky. For the vocal mic it helps to use something the player/singer can get really close to like an SM7. I have also had some luck putting the guitar/voc mics in fig8 and orienting the position so the node is pointing at the player/singers mouth/sound hole. That definitely eliminates all of the low end of the voice from the guitar mic and visa versa.
Hope that helps!"
EV
SOURCE
Eric Valentine on the Shure SM7b
I pretty much always have the HP engaged on the SM7. I can't think of an instance when it was off right now. I always use an external pop filter (the high end seems way better to me that way). The presence peak is totally based on the singer. I find that singers who have a thicker voice with a lot of over tones need the presence peak. Singers that have a cleaner voice can start to sound to small and mid rangy with the presence peak on. Here are some examples of singers that were definitely one way or the other for me:
Adam Lazzara - peak on
John Nolan - peak off
Steve Harwell - peak on
Myles Kennedy - Peak off
Chris Cornell - Peak on
Sara Watkins - Peak off
EV
SOURCE
Adam Lazzara - peak on
John Nolan - peak off
Steve Harwell - peak on
Myles Kennedy - Peak off
Chris Cornell - Peak on
Sara Watkins - Peak off
EV
SOURCE
Tom Dowd on Capturing a Band's Sound
Tom Dowd was known to walk into the tracking room and stand by each band member and listen and then stand in the center of the room and listen. Afterwards, he would walk back into the control room and make what came out of the speakers sound like what he heard when standing next to the band.

SOURCE

SOURCE
Phill Brown on His Tracking Mic Template
While at Island Studios this was Phill Brown's tracking template for mic choice.
Kick: AKG D20 or AKG D12
Snare: AKG 224
OH: Neumann U87
Toms: Neumann U87
Bass: DI and AKG D20
Guitars: Neumann U87 or AKG D20
Piano: Neumann U87 or Neumann KM84
After 1976...
Kick: AKG D20
Snare: Shure SM57
OH: Neumann U87, Neumann KM84, Coles, RCA
Toms: Sennheiser 421
Guitars: Coles, Neumann U87, AKG D20/30
Piano: Coles, Neumann U87
SOURCE
Butch Vig & Billy Bush on Tracking Bass Guitar
"In my experiences with BV, it's a combo of DI, amp and Sansamp RB1
Not much eq going in as we get the sound from the bass and amp first. On the last couple of records we've done together the DI has been the A-Designs Reddi into a LA2A and the mic has been either a Blue Mouse, a U47 Fet or a small condenser like the jospehson es22. The preamp has been a Chandler TG-2, Groove Tubes Vipre or Neve 1073.
For rock, nothing beats a great old SVT and 8x10.
For the Garbage stuff, it's pretty much always been a B-15.
Effects-wise, the Prescription Depth Charge, the sansamp and the EH bass microsynth are usually the first things to try!"
"Lately I like to record the rhythm guitars first, then do bass.
It's much easier to tell how much midrange or top end you need when the bass has to compete with a wall of guitars."
The majority of low end in the bass comes from the bass amp, the Sans Amp is set with a fair amount of distortion to add midrange to the signal and little to no DI. That's the blend for the bass.
SOURCE
Butch Vig Recommends Cheap Mics
"AKG make a good mic C3000, large diaphragm, you might be able to get it on Ebay for a couple hundred bucks. The Audio Technica 4047 is also good and not very expensive."
 |
| AKG c3000 |
 |
| Audio Technica 4047 |
Butch Vig on Tracking Bands Live
Butch Vig is known to track bands live for both the vibe and natural bass and drum connection. Bassists and drummers lock in to each other in a more organic way when they play together. And this allows the guitars to play more naturally as they would if it were a live concert.
He almost always isolates any guitar or bass amps and will often overdub or replace the guitar tracks, sometimes the bass track as well. But most times he keeps the drum takes.

SOURCE
He almost always isolates any guitar or bass amps and will often overdub or replace the guitar tracks, sometimes the bass track as well. But most times he keeps the drum takes.

SOURCE
Daniel Lanois on Control Room Vocals
Daniel is known to track strong vocalists from the control room with no headphones just the monitors in the control room playing the band track. He turns off the vocalist in the mix and turns the overall volume down. He also uses a Shure Beta 58, which already rejects more bleed than another condenser microphone.


SOURCE

SOURCE
Daniel Lanois on Tracking Drums
Kick: AKG D12 and Coles ribbon mic (placed 3 feet away)
Snare: Shure SM57
OH: RCA 44 (but unlike most engineers, Lanois opts to put his overhead over the rack toms. So, in all intents and purposes it's a tom mic that acts as an overhead as well)


Snare: Shure SM57
OH: RCA 44 (but unlike most engineers, Lanois opts to put his overhead over the rack toms. So, in all intents and purposes it's a tom mic that acts as an overhead as well)


"There are two philosophies for recording drums. You can completely isolate the drums or not isolate them at all. Lately I've been using the latter approach. I just did a recording with my drummer, Brian Blade, sitting right next to me. My amps were right by his kit, and we treated it all as one. We miked everything separately, but we didn't put the guitar amps down the hall to separate them from the drums like I'd normally do.
"I've discovered that musicians self-balance if you keep them close together," he elaborates. "Musicians try to harmonize and balance so everything sounds musical in its acoustic form. I seem to get my best results when people are close together. When I listen back to those recordings, they have more depth of field and the positioning just automatically adjusts itself so you don't have to do much fake positioning with mixing."
--Daniel Lanois
Daniel Lanois on Tracking Vocals
Daniel Lanois has a track record for producing that has hit every who's who in popular music, working with; U2, Bob Dylan, Neil Young, Emmy Lou Harris, Willie Nelson, and many more.
So...when he says something about how to capture vocals...I'm going to listen.
Daniel is partial to recording vocalists with mics that most would consider to be a live microphone instead of old condenser mics.

He's been known to track Bono of U2 exclusively with either the Shure Beta 58 or Shure SM58.
"I find singers perform better when it's like they're performing on stage. The Beta 58s sounds great when the singer gets right on top of it and it minimizes drum leakage."
I've found this to be the case too, not that you need my opinion. Try it out! I've learned that half the battle is making the singer feel comftorable. If you can reduce the pressure of the studio and let the artist emote into the mic, the performance captured will be better for it.
SOURCE
Recording Drums with Bob Clearmountain
Using Two Mics
Shure Beta 52a placed inside kick drum which is baffled to deaden the sound. In my experience for most popular style genres, deadened kicks record better. For styles like jazz, you may want to leave a bit more resonance and note to the kick drum. Talk to the artist, they probably know their music better than you do.
For the overhead mic, Bob used a large diaphragm condenser set to cardioid overlooking the toms and the snare drum
Using Four Mics
OH: Bob used two Neumann U87's placed 31" from the diaphragm of the mic to the rack toms, overlooking the kit.
Snare Top: Shure SM57 (no snare bottom mic necessary)
Kick: AKG D112 inside the kick drum hanging inside the kick drum shell, suspended in the center.
Using Multiple Mics
Kick: Shure Beta 52a placed inside kick drum port for more attack of the beater.
OH: Here, Bob uses a stereo ribbon mic for his overhead mic, the Royer SF-12.
Toms: Sennheiser 604e, a fantastic clip on mic (usually for live purposes). Bob extends the clip as far as it goes to get the most body out of the tom toms.
HH: AKG C452, about 3.5-4" away pointed at the bell of the hi-hat on the top side, for a crisper attack.
Snare Top: Shure SM57 about an inch and a half above the snare and just past the rim of the snare, pointed toward the center of the drum.
Snare Bottom: Shure SM57, off-axis pointed toward the center of the snare about 2 inches away from snares and with it's phase flipped.
Room: Neumann U87, set to omni and placed a few foot above head height and slightly angled.
Daptone Records on Tracking Drums with One Mic
About as unusual and minimal as you can get these days for drum tracking, Daptone Studios takes the cake. Gabriel Roth, bassist for Sharon Stone and engineer at Daptone Studios takes an old school approach to tracking drums. He'll either use a RCA DX77 or a Shure 55.
Place the mic on the hi-hat side between the kick and the snare pointed toward the snare drum. Leave the mic about two feet away from the snare.


Gabriel will often use other cheap microphones to get his drum sound. He favors Radio Shack dynamic mics pointed over the drummer's left shoulder when the 55 doesn't sound right for the track.
Gabriel believes that having one mic allows for the drummer to balance themselves and for a smooth tom performance as the volume lessens as the drummer moves across the kit. An example of this can be heard in Amy Winehouse's song "Rehab".
SOURCE
Subscribe to:
Posts (Atom)